用一段php代码,免插件的方式,实现图片上传WordPress网站,自动将JPEG、PNG、GIF等转换为WebP格式图片。大大提高网站文章编辑的效率。之前我在写文章的时候,上传图片到网站的流程是先手动把本地的图片到一些站点,比如Squoosh、TinyPNG,进行WebP格式转化压缩,之后再手动上传到网站。这个过程实际上非常耗时,且机械重复没什么技术含量。一直想着有什么方法可以上传图片到网站的过程中自动就把这些活干了,省时省力。以前也尝试过一些插件,要么免费额度太少,要么过多的插件影响网站速度。
为什么要使用WebP格式的图片
WebP格式图片是由 Google 推出的一种现代图像格式,用来替代传统的图像格式如 JPEG、PNG、GIF 等。
相比 JPEG、PNG和GIF,WebP 通常可以提供更小的文件大小,同时保持相似或更好的图像质量。
较小的图片体积让网页加载更快,能够提高用户体验。快速加载的网页对 SEO(搜索引擎优化) 更好,提升网站在 Google、百度 等搜索引擎中的排名。
自动转化WebP代码
代码功能说明:
• 自动识别并将上传的图片jpeg、png、gif格式的图片转换为WebP格式
• 图像质量为80%(如果要设置其他值,可更改代码中的 $quality = 80,建议值 70-90% )
• 不保留原文件(如果要保留,删除或注释这个代码 @unlink($file_path); )
/** * Convert Uploaded Images to WebP Format with Custom Quality */add_filter('wp_handle_upload', 'wpturbo_handle_upload_convert_to_webp');function wpturbo_handle_upload_convert_to_webp($upload) { if (in_array($upload['type'], ['image/jpeg', 'image/png', 'image/gif'])) { $file_path = $upload['file']; if (extension_loaded('imagick') || extension_loaded('gd')) { $image_editor = wp_get_image_editor($file_path); if (!is_wp_error($image_editor)) { // Set WebP quality (adjust as needed)$quality = 80; // Adjust between 0 (low) to 100 (high) $image_editor->set_quality($quality); // Set quality for WebP conversion $file_info = pathinfo($file_path); $dirname = $file_info['dirname']; $filename = $file_info['filename']; $def_filename = wp_unique_filename($dirname, $filename . '.webp'); $new_file_path = $dirname . '/' . $def_filename; $saved_image = $image_editor->save($new_file_path, 'image/webp'); if (!is_wp_error($saved_image) && file_exists($saved_image['path'])) { // Update the upload data to use the WebP image $upload['file'] = $saved_image['path']; $upload['url'] = str_replace(basename($upload['url']), basename($saved_image['path']), $upload['url']); $upload['type'] = 'image/webp'; // Optionally delete the original file@unlink($file_path); } } } } return $upload;}
建议代码用Code Snippets、WPCode等插件进行统一管理。

实际测试
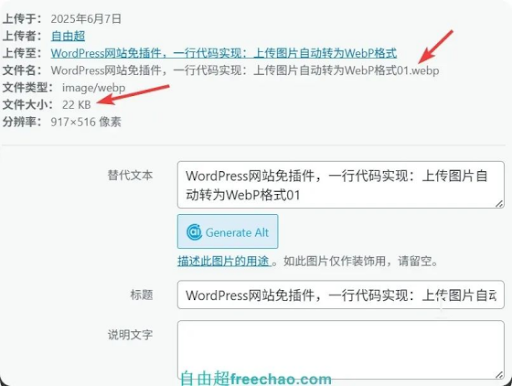
上传前格式为PNG,大小为816kb
|

上传后格式自动为WebP,大小为22kb,变化极其明显
|
评论
发表评论